Kanban

Cycle Time Correlations

Improving flow is a key goal for nearly all organisations. More often than not, the primary driver for this is speed, commonly referred to as Cycle Time. As organisations try to reduce this and improve their time to (potential) value, what factors correlate with speed? This blog, inspired by the tool DoubleLoop, looks at the correlations Cycle Time has with other flow-based data…

The correlation of metrics

A few months ago I came across a tool called DoubleLoop. It is unique in that it allows you to plot your strategy in terms of your bets, the work breakdown and key metrics, all onto one page. The beauty of it is that you can see the linkage to the work you do with the metrics that matter, as well as how well (or not so well) different measures correlate with each other.

For product-led organisations, this opens up a whole heap of different options around visualising bets and their impact. The ability to see causal relationships between measures is a fantastic invitation to a conversation around measuring outcomes.

Looking at the tool with a flow lens, it also got me curious, what might these correlations look like from a flow perspective? We’re all familiar with things such as Little’s Law but what about the other practices we can adopt or the experiences we have as work flows through our system?

As speed (cycle time) is so often what people care about, what if we could see which measures/practices have the strongest relationship with this? If we want to improve our time to (potential) value, what should we be focusing on?

Speed ≠ value and correlation ≠ causation

Before looking at the data, an acknowledgement about what some of you reading may well be pointing out.

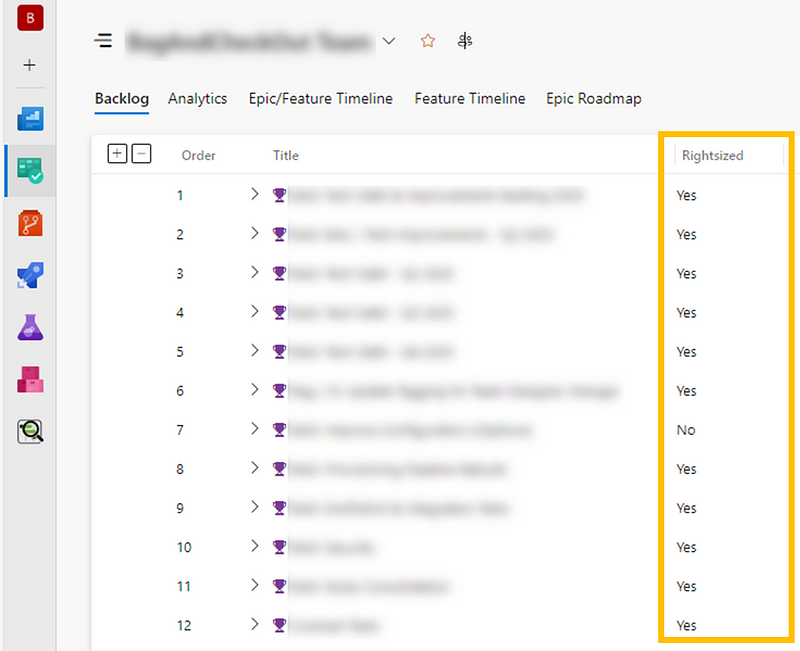
The first is that speed does not equate to value, which is a fair point, albeit one I don’t believe to be completely true. We know from the work of others that right-sizing trumps prioritisation frameworks (specifically Cost of Delay Divided by Duration — CD3) when it comes to value delivery.

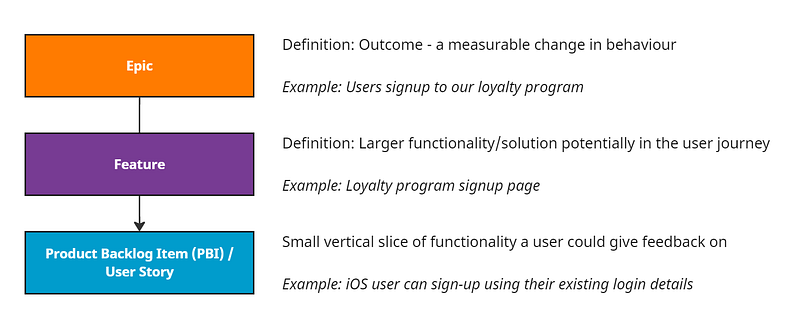
Given right-sizing is part influenced by duration (in terms of calendar days), and the research above, you could easily argue that speed does impact value. That being said, the data analysed in this blog looked at work items at User Story/Product Backlog Item level, which is difficult to quantify the ‘value’ that brings.

A harder to disagree with point is the notion that correlation does not equal causation. Just like the biomass power generated in the Philippines correlates with Google searches for ‘avocado toast’, there probably isn’t a link between the two.

However, we often infer in working with our teams about things they should be doing when using visual management of work. For some, these are undoubtedly linked, for example how long an item has been in-progress is obviously going to have a strong relationship with how long it took to complete. Others are more for up for debate such as, do we need to regularly be updating work items? Or should we be going granular with our board design/workflows? The aim of this blog is to try challenge some of that thinking, backed by data.

For those curious, a total of 15,421 work items completed by 70 teams over the since June 1st 2024 were used as input to this research. Given this size, there may be other causal relationships at play (team size, length of time together, etc.) that are not included in this analysis.

Without further delay, let’s start looking at the different factors that may influence Cycle Time…

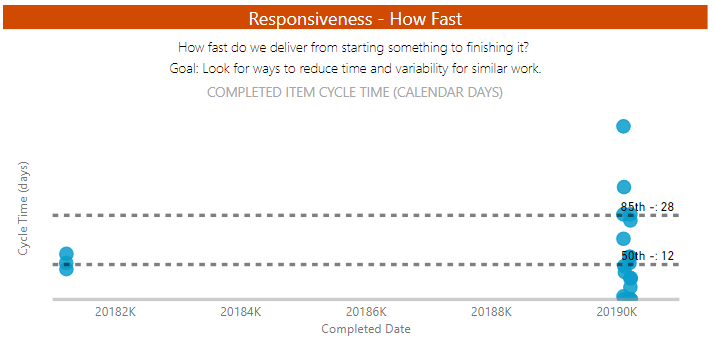
Days since an item was started (Work Item Age)

One of the most obvious factors that plays into Cycle Time is how long an item has been in-progress, otherwise known as Work Item Age.

Clearly this has the strongest correlation with Cycle Time as, when your item is in-progress, it will have been in that state for a number of days and then once it moves to ‘done’ there should never be a difference in those two values.

The results reflect that with a correlation coefficient of 1.000, and about as strong a positive correlation as you will ever see. This means that above everything else, we should always be focusing on Work Item Age if we’re trying to improve speed.

Elapsed time since a work item was created (Lead Time)

The next thing to consider is how long it’s been since an item was created. Often referred to as ‘Lead Time’, this will often be different to Cycle Time as there may be queues before work actually starts on an item.

This is useful to validate our own biases. For example, I have often made the case to teams that anything older than three months on the backlog probably should just be deleted, as YAGNI.

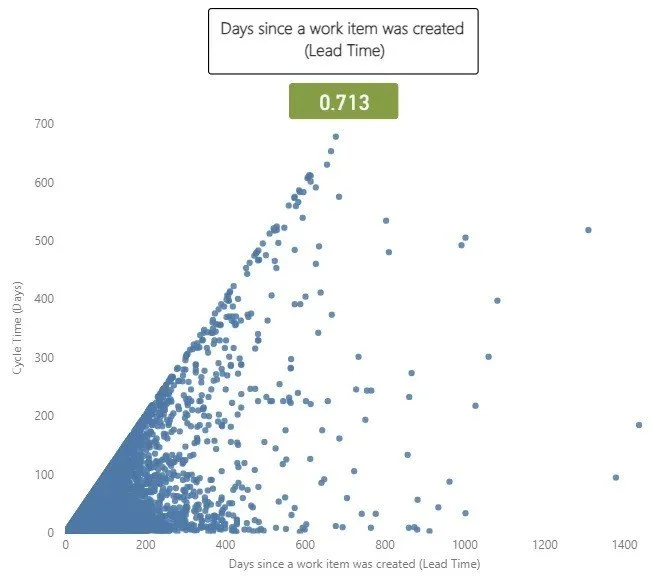
This had a correlation coefficient with of 0.713, which is a very strong correlation. This is to be largely expected, as longer cycle times invariably will mean longer lead times, given it (more often than not) makes up a large proportion of that metric.

Time taken to start an item

A closely related metric to this is the time (in days) it took us to start work on an item. There are two schools of thought to challenge here. One is the view of “we just need to get started” and the other being that potentially the longer you leave it, the less likely you’re going to have that item complete quickly (as you may have forgotten what it is about).

This one surprised me. I expected somewhat a stronger relationship than the 0.166 correlation. This shows there is some relationship but it is weak and therefore not going to impact your cycle time how quickly you do (or don’t!) start work on an item.

The number of comments on a work item

The number of comments made on a work item is the next measure to look at. The idea with this measure would be that more comments likely mean items take longer, due to their being ambiguity around the work item, blockers/delays, feedback etc.

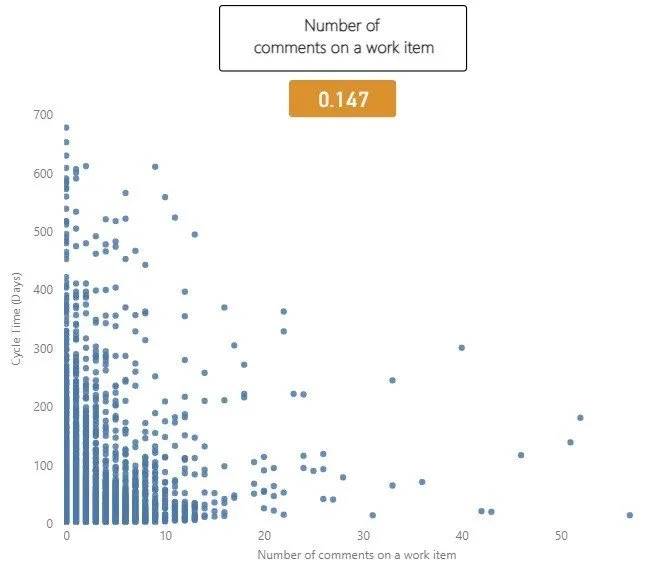
Interestingly in this dataset there was minimal correlation, with a correlation coefficient of 0.147. This suggests there is a slight tendency for work items with more comments to have a longer cycle time, but we can see that after 12 or so comments this doesn’t seem to be true. This could be that by this point, clarification is reached/issues are resolved. Of course, once we go past this value there are far less items that have that amount of comments.

The number of updates made to a work item

How often a work item is updated is the next measure to consider. The rationale for this being teams are often focused on ensuring work items are ‘up to date’ and trying to avoid them going stale on the board:

An update is any change made to an item which, of course means that automations could be in place to skew the results. With the data used, it was very hard to determine those which were automated updates vs. genuine ones, which means there is a shortcoming in using this. There were some extreme outliers with more than 120 updates, which were easy to filter out. However once I started going past this point there was no way to easily determine which were automated vs. genuine (and I was not going to do this for all 15,421 work items!).

Interestingly here we see a somewhat stronger correlation than before, of 0.261. This is on the weak to moderate scale correlation wise. Of course this does not mean just automating updates to work items will improve flow!

The number of board columns a team has

The next measure to consider is the number of board columns a team has. The reason for looking at this is that there are different schools of thought around how ‘granular’ you should go with your board design. Some argue that To Do | Doing | Done is all that is needed. Others would say viewing by specialism helps see bottlenecks and some would even say more high-level views (e.g. Options | Identifying the problem | Solving the problem | Learning) encourages greater collaboration.

The results show that really, it doesn’t matter what you do. The weak correlation of 0.046 shows that really, board columns don’t have any part to play in relation to speed.
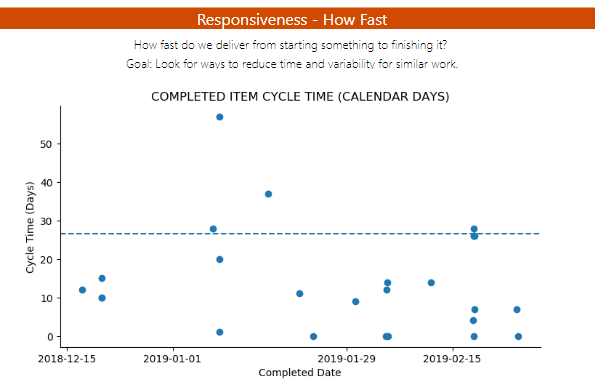
Flow Efficiency

Flow efficiency is an adaptation from the lean world metric of process efficiency. This is where for a particular work item we measure the percentage of active time — i.e., time spent actually working on the item against the total time (active time + waiting time) that it took to for the item to complete.

This one was probably the most surprising. A correlation coefficient of -0.343 suggests a moderate negative correlation. What this means is that as Flow Efficiency increases, Cycle Time tends to decrease. The correlation of -0.343 shows this the relationship between the two whilst not very strong is certainly meaningful.

The number of times a work item was blocked

The final measure was looking at how often a work item was blocked. The thinking with this one would be if work is frequently getting blocked then surely this will increase the cycle time.

It’s worth noting a shortcoming here is not how long it was blocked for, just how often blocked. So, for example, if an item was blocked once but it was blocked for nearly all the cycle time, it would still only register as being blocked once. Similarly, this is obviously dependant on teams blocking work when it is actually blocked (and/or having a clear definition of blocked).

Here we have the weakest of all correlations, 0.021. This really surprised me as I would have thought the blocker frequency would impact cycle time, but the results of this suggest otherwise.

Summary

So what does this look like when we bring it all together? Copying the same style of DoubleLoop, we can start to see which of our measures have the strongest and weakest relationship with Cycle Time:

What does this mean for you and your teams?

Well, it’s clear that Work Item Age is the key metric to focus on, given just how closely it correlates with Cycle Time. If you’re trying to improve (reduce) Cycle Time without looking at Work Item Age, you really are wasting your efforts.

After that, you want to consider how long something has been on the backlog for (i.e. how long it was since it was created). Keeping work items regularly updated is the next thing you can be doing to reduce cycle time. Following this, retaining a balance of the time taken to start a work item and keeping an eye on the comment count would be something to consider.

The number of board columns a team has and how often work is marked as blocked seem to have no bearing on cycle time. So don’t worry too much about how simplified or complex your kanban board is, or focusing retros on those items blocked the most. That being said, a shortcoming of this data is that it is missing the impact of blockers.

Finally, stop caring so much about flow efficiency! Optimising flow efficiency is more than likely not going to make work flow faster, no matter what your favourite thought leader might say.

Continuously right-sizing your Azure DevOps Features using Power Automate

A guide to continuously right-sizing Azure DevOps (ADO) Features using OData queries and Power Automate…

Context

Right-sizing is a flow management practice that ensures work items remain within a manageable size. Most teams apply this at the User Story or Product Backlog Item (PBI) level, using historical Cycle Time data to determine the 85th percentile as their right-size, meaning 85% of items are completed within a set number of days. This is often referred to as a Service Level Expectation (SLE).

“85% of the time we complete items in 7 days or less”

In combination with this, teams use Work Item Age, the amount of elapsed time in calendar days since a work item started, to proactively manage the flow of work that is “in-progress”. Previously I have shared how you can automate the Cycle Time, SLE and Work Item Age to your ADO boards.

Right-sizing isn’t limited to Stories or PBIs — it also applies to Features (and Epics!), which group multiple Stories or PBIs. For Features, right-sizing means keeping the child item count below a manageable limit.

To understand what this right-size is, we choose a selected date range, plotting our completed Features against the date they were completed and the number of child items they had. We can then use percentiles to derive what our ‘right-size’ is (again typically taking the 85th percentile):

Good teams will then use this data to proactively check their current ‘open’ Features (those in progress/yet to start) and see if those Features are right-sized:

Right-sizing brings many benefits for teams as it means faster feedback, reduced risk and improved predictability. The challenge is that this data/information will almost always live in a different location to the teams’ work. In order for practices such as right-sizing to become adopted by more teams it needs to be simple and visible every day so that teams are informed around their slicing efforts and growth of feature size.

Thankfully, we can leverage tools like Power Automate, combined with ADO’s OData queries to make this information readily accessible to all teams…

Prerequisites

This guide assumes the following prerequisites:

With all those in place — let’s get started!

Adding a custom field for if a Feature is right-sized is not

We first need to add a new field into our process template in ADO called Rightsized. As we are focusing on right-sizing of Features, for the purpose of simplicity in this blog we will stick to Feature as the work item type we will set this up for and be using an inheritance of the Scrum process template.

Please note, if you are wanting to do this for multiple work item types you will have to repeat the process of adding this field for each work item type.

  • Find the Feature type in your inherited process template work items list

  • Click into it and click ‘new field’

  • Add the Rightsized field — ensuring you specify it as picklist type field with two options, “Yes” or “No”

Understanding our Feature right-size

As mentioned earlier in the blog, we plot our completed Features over a given time period (in this case 12 weeks) against the date they were completed on and the number of child items those Features had. We can then draw percentiles against our data to understand our ‘right-size’:

If you’re wondering where the tools are to do this, I have a free template for Power BI you can download and connect to/visualise your ADO data.

For the purpose of simplicity, in this blog we’re going to choose our 85th percentile as our right-size value so, for this team, they have a right-size of 14 child items or less.

Automating our right-size check

Start by creating two ADO queries for automation. The first will retrieve completed Features within a specified time range. A 12-week period (roughly a quarter) works well as a baseline but can be adjusted based on your planning cadence. In this example, we’re querying any Features that were ‘Completed’ in the last 12 weeks, that are owned by a particular team (in this example they are under a given Area Path):

Save that query with a memorable name (I went with ‘Rightsizing Part 1’) as we’ll need it later.

Then we’re going to create a second query for all our ‘open’ Features. Here you’re going to do a ‘Not In’ for your completed/removed states and those that are owned by this same team (again here I’ll be using Area Path):

Make sure ‘rightsized’ is added as a column option and save that query with a memorable name (I went with ‘Rightsizing Part 2’) as we’re going to need it later.

Next we go to Power Automate and we create a Scheduled cloud flow. Call this whatever you want but we want this to run every day at a time that makes sense (probably before people start work). Once you’re happy with the time click create:

Next we need to click ‘+ new step’ and add an action to Get query results from the first query we just set up. ensuring that we input the relevant ‘Organization Name’ and ‘Project Name’ where we created the query:

Following this we are going to add a step to Initialize variable — this is essentially where we will ‘store’ what our Rightsize is which, to start with, will be an Integer with a value of 0:

We’re going to repeat this step a few more times, as we’re Initialize variable for ranking Features (as a ‘float’ type) by their child item count:

Then we will Initialize Variable to flatten our array value, which we’re going to need towards the end of the flow to get our data in the format we need it to be in to do the necessary calculations:

Our final Initialize Variable will be for our Interpolated Value, which is a ‘float’ value we’re going to need when it comes to calculating the percentile for our right-sizing:

Then we are going to add an Apply to each step where we’ll select the ‘value’ from our ‘Get query results’ step as the starting point:

Then we’re going to choose a HTTP step. You’ll need to set the method as ‘GET’ and add in the the URL. The first part of the URL (replace ORG and PROJECT with your details) should be:

https://analytics.dev.azure.com/ORG/PROJECT/_odata/v3.0-preview/WorkItems?%20$filter=WorkItemId%20eq%20

Add in the dynamic content of ‘Id’ from our Get work item details step, then add in:

%20&$select=WorkItemID&$expand=Descendants(%20$apply=filter(WorkItemType%20ne%20%27Test%20Case%27%20and%20StateCategory%20eq%20%27Completed%27%20and%20WorkItemType%20ne%20%27Task%27%20and%20WorkItemType%20ne%20%27Test%20Plan%27%20and%20WorkItemType%20ne%20%27Shared%20Parameter%27%20and%20WorkItemType%20ne%20%27Shared%20Steps%27%20and%20WorkItemType%20ne%20%27Test%20Suite%27%20and%20WorkItemType%20ne%20%27Impediment%27%20)%20/groupby((Count),%20aggregate($count%20as%20DescendantCount))%20)

Which should look like:

Click ‘Show advanced options’ and add your PAT details — Set authentication to ‘Basic,’ enter ‘dummy’ as the username, and paste your PAT as the password:

PAT blurred for obvious reasons!

Then we need to add in a Parse JSON step. This is where we are essentially going to extract our count of child items from our completed Features. Choose ‘body’ as the content and add a schema like so:

{
    "type": "object",
    "properties": {
        "@@odata.context": {
            "type": "string"
        },
        "vsts.warnings@odata.type": {
            "type": "string"
        },
        "@@vsts.warnings": {
            "type": "array",
            "items": {
                "type": "string"
            }
        },
        "value": {
            "type": "array",
            "items": {
                "type": "object",
                "properties": {
                    "WorkItemId": {
                        "type": "integer"
                    },
                    "Descendants": {
                        "type": "array",
                        "items": {
                            "type": "object",
                            "properties": {
                                "@@odata.id": {},
                                "Count": {
                                    "type": "integer"
                                },
                                "DescendantCount": {
                                    "type": "integer"
                                }
                            },
                            "required": [
                                "@@odata.id",
                                "Count",
                                "DescendantCount"
                            ]
                        }
                    }
                },
                "required": [
                    "WorkItemId",
                    "Descendants"
                ]
            }
        }
    }
}

This is where it gets a bit more complicated, we’re then going to add an Apply to each step, using the value from our previous step. Then do ANOTHER Apply to each where we’re going to take the descendant count for each Feature and append it to our FlattenedArray variable:

Then we’re going to go outside our Apply to each loop and add a Compose step to sort our child item counts:

Then we’re going to add a Set Variable step where we’re going to set our Rank variable using the following expression:

float(add(mul(0.85, sub(length(outputs('SortedCounts')), 1)), 1))

Next we’re going to do the part where we work out our 85th percentile. To start with, we first need to figure out the integer part. Add a compose action with the following expression:

int(substring(string(variables('rank')), 0, indexOf(string(variables('rank')), '.')))

Then add another compose part for the fractional part, using the expression of:

sub(float(variables('rank')), int(substring(string(variables('rank')), 0, indexOf(string(variables('rank')), '.'))))

Then we’re going to add a Compose step for formatting this to be one decimal place, we do using:

formatNumber(outputs('Compose_FractionalPart'), 'N1')

Then we’re going to initialize another variable, which we do simply to “re-sort” our array (I found in testing this was needed). This will have a value of:

sort(variables('FlattenedArray'))

Then we’re going to set our FlattenedArray variable to be the output of this step:

Then we need to calculate the value at our Integer position:

variables('FlattenedArray')[sub(int(outputs('Compose_IntegerPart')), 1)]

Then do the same again for the value at the next integer position:

variables('FlattenedArray')[outputs('Compose_IntegerPart')]

Then add a compose for our interpolated value:

add(
    outputs('Compose_ValueAtIntegerPosition'),
    mul(
        outputs('Compose_FractionalPart'),
        sub(
            outputs('Compose_ValueAtNextIntegerPosition'),
            outputs('Compose_ValueAtIntegerPosition')
        )
    )
)

Remember the variable we created at the beginning for this? This is where we need it again, using the outputs of the previous step to set this as our InterpolatedValue variable:

Then we need to add a Compose step:

if(
    greaterOrEquals(mod(variables('InterpolatedValue'), 1), 0.5),
    formatNumber(variables('InterpolatedValue'), '0'),
    if(
        less(mod(variables('InterpolatedValue'), 1), 0.5),
        if(
            equals(mod(variables('InterpolatedValue'), 1), 0),
            formatNumber(variables('InterpolatedValue'), '0'),
            add(int(first(split(string(variables('InterpolatedValue')), '.'))), 1)
        ),
        first(split(string(variables('InterpolatedValue')), '.'))
    )
)

Then we just need to reformat this to be an integer:

int(outputs('Compose'))

Then we use the output of this to set our rightsize variable:

Next step is to use ADO again, get query results of our second query we created for all our ‘open’ features:

Then we’re going to add an Apply to each step using the value from the previous step. Then a HTTP step with the method as ‘GET’ and add in the the URL. This URL is different than the one above! The first part of the URL (replace ORG and PROJECT with your details) should be:

https://analytics.dev.azure.com/ORG/PROJECT/_odata/v3.0-preview/WorkItems?%20$filter=WorkItemId%20eq%20

Add in the dynamic content of ‘Id’ from our Get work item details step, then after the Id, add in:

%20&$select=WorkItemID&$expand=Descendants(%20$apply=filter(WorkItemType%20ne%20%27Test%20Case%27%20and%20State%20ne%20%27Removed%27%20and%20WorkItemType%20ne%20%27Task%27%20and%20WorkItemType%20ne%20%27Test%20Plan%27%20and%20WorkItemType%20ne%20%27Shared%20Parameter%27%20and%20WorkItemType%20ne%20%27Shared%20Steps%27%20and%20WorkItemType%20ne%20%27Test%20Suite%27%20and%20WorkItemType%20ne%20%27Impediment%27%20)%20/groupby((Count),%20aggregate($count%20as%20DescendantCount))%20)

Which should look like:

Make sure again to click ‘Show advanced options’ to add in your PAT details. Then add a Parse JSON step, this is where we are essentially going to extract our count of child items from our open Features. Choose ‘body’ as the content and add a schema like so:

{
    "type": "object",
    "properties": {
        "@@odata.context": {
            "type": "string"
        },
        "vsts.warnings@odata.type": {
            "type": "string"
        },
        "@@vsts.warnings": {
            "type": "array",
            "items": {
                "type": "string"
            }
        },
        "value": {
            "type": "array",
            "items": {
                "type": "object",
                "properties": {
                    "WorkItemId": {
                        "type": "integer"
                    },
                    "Descendants": {
                        "type": "array",
                        "items": {
                            "type": "object",
                            "properties": {
                                "@@odata.id": {},
                                "Count": {
                                    "type": "integer"
                                },
                                "DescendantCount": {
                                    "type": "integer"
                                }
                            },
                            "required": [
                                "@@odata.id",
                                "Count",
                                "DescendantCount"
                            ]
                        }
                    }
                },
                "required": [
                    "WorkItemId",
                    "Descendants"
                ]
            }
        }
    }
}

This is where it gets a bit more complicated, we’re then going to add an Apply to each step, using the value from our previous step. Then do ANOTHER Apply to each where we’re going to take the descendant count for each ‘open’ Feature. Then we’re going to add a condition step. Where we’ll look at each open Feature and see if the Descendant count is less than or equal to our Rightsize variable:

If yes, then we add an update work item step and ensure that we are choosing the ID and Work Item Type of the item from our query previously, and setting the Rightsized value to “Yes”. If no, then do the same as above but ensure you’re setting the Rightsized value to “No”:

And that’s it — you’re (finally) done!

If you run the automation, then it should successfully update your Features if they are/are not right-sized:

It’s worth noting that any Features with 0 child items aren’t updated with yes/no, purely due to this likely being too early on in the process. Saying a Feature with 0 child items is ‘right-sized’ feels wrong to me but you are welcome to amend the flow if you disagree!

There may be tweaks to the above you could make to improve flow performance, currently it runs at 1–2 minutes in duration:

By implementing continuous right-sizing in Azure DevOps using Power Automate, teams can drive faster feedback loops, reduce delivery risks, and improve predictability. Automating the right-sizing check ensures the data remains visible and actionable, empowering teams to stay focused on maintaining manageable work sizes. With this flow in place, you’re not just optimising features — you’re fostering a culture of continuous improvement and efficiency.

Stay tuned for my next post, where I’ll explore how to apply the same principles to Epics in Jira!

Outcome focused roadmaps and Feature Monte Carlo unite!

Shifting to focusing on outcomes is key for any product operating model to be a success, but how do you manage the traditional view on wanting to see dates for features, all whilst balancing uncertainty? I’ll share how you can get the best of both worlds with a Now/Next/Later X Feature Monte Carlo roadmap…

What is a roadmap?

A roadmap could be defined as one (or many) of the following:

Where do we run into challenges with roadmaps?

Unfortunately, many still view roadmaps as merely a delivery plan to execute. They simply want a list of Features and when they are going to be done by. Now, sometimes this is a perfectly valid ask, for example if efforts around marketing or sales campaigns are dependent on Features in our product and when they will ship. More often than not though, it is a sign of low psychological safety. Teams are forced to give date estimates when they know the least and are then “held to account” for meeting that date that is only formulated once, rather than being reviewed continuously based on new data and learning. Delivery is not a collaborative conversation between stakeholders and product teams, it’s a one-way conversation.

What does ‘good’ look like?

Good roadmaps are continually updated based on new information, helping you solicit feedback and test your thinking​, surface potential dependencies and ultimately achieve the best outcomes with the least amount of risk and work​.

In my experience, the most effective roadmaps out there find the ability to tie the vision/mission for your product to the goals, outcomes and planned features/solutions for the product. A great publicly accessible example is the AsyncAPI roadmap:

A screenshots of the ASyncAPI roadmap

Vision & Roadmap | AsyncAPI Initiative for event-driven APIs

Here we have the whole story of the vision, goals, outcomes and the solutions (features) that will enable this all to be a success.

To be clear, I’m not saying this is the only way to roadmap, as there are tonnes of different ways you can design yours. In my experience, the Now / Next / Later roadmap, created by Janna Bastow, provides a great balance in giving insight into future trajectory whilst not being beholden to dates. There are also great templates from other well known product folk such as Melissa Perri’s one here or Roman Pichler's Go Product Roadmap to name a few. What these all have in common is they are able to tie vision, outcomes (and even measures) as well as features/solutions planned to deliver into one clear, coherent narrative.

Delivery is often the hardest part though, and crucially how do we account for when things go sideways?

The uncertainty around delivery

Software development is inherently complex, requiring probabilistic rather than deterministic thinking about delivery. This means acknowledging that there are a range of outcomes that can occur, not a single one. To make informed decisions around delivery we need to be aware of the probability of that outcome occurring so we can truly quantify the associated “risk”.

I’ve covered in a previous blog about using a Feature Monte Carlo when working on multiple features at once. This is a technique teams adopt in understanding the consequences around working on multiple Features (note: by Feature I mean a logical grouping of User Stories/Product Backlog Items), particularly if you have a date/deadline you are working towards:

An animation of a feature monte carlo chart

Please note: all Feature names are fictional for the purpose of this blog

Yet this information isn’t always readily accessible to stakeholders and means navigating to multiple sources, making it difficult to tie these Features back to the outcomes we are trying to achieve.

So how can we bring this view on uncertainty to our roadmaps?

The Now/Next/Later X Feature Monte Carlo Roadmap

The problem we’re trying to solve is how can we quickly and (ideally) cheaply create an outcome oriented view of the direction of our product, whilst still giving that insight into delivery stakeholders need, AND balance the uncertainty around the complex domain of software development?

This is where our Now/Next/Later X Feature Monte Carlo Roadmap comes into the picture.

Using Azure DevOps (ADO) as our tool of choice, which has a work item hierarchy of Epic -> Feature -> Product Backlog Item/User Story. With some supporting guidance, we can make it clear around what each level should entail:

An example work item hierarchy in Azure DevOps

You can of course rename these levels if you wish (e.g. OKR -> Feature -> Story) however we’re aiming to do this with no customisation so will stick with the “out-the-box” configuration. Understanding and using this setup is important as this will be the data that feeds into our roadmap.

Now let’s take a real scenario and show how this plays out via our roadmap. Let’s say we were working on launching a brand new loyalty system for our online eCommerce site, how might we go about it?

Starting with the outcomes, let’s define these using the Epic work item type in our backlog, and where it sits in our Now/Next/Later roadmap (using ‘tags’). We can also add in how we’ll measure if those outcomes are being achieved:

An example outcome focused Epic in ADO

Note: you don’t have to use the description field, I just did it for simplicity purposes!

Now we can formulate the first part of our roadmap:

A Now, Next, Later roadmap generated from ADO data

For those Epics tagged in the “Now”, we’re going to decompose those (ideally doing this as team!) into multiple Features and relevant Product Backlog Items (PBIs). This of course should be done ‘just in time’, rather than doing it all up front. Techniques like user story mapping from Jeff Patton are great for this. In order to get some throughput (completed PBIs) data, the team are then going to start working through these and moving items to done. Once we have sufficient data (generally as little as 4 weeks worth is enough), we can then start to view our Feature Monte Carlo, playing around with the parameters involved:

A Feature Monte Carlo generated from ADO data

The real value emerges when we combine these two visuals. We can have the outcome oriented lens in the Now / Next / Later and, if people want to drill down to see where delivery of those Features within that Epic (Outcome) is, they can:

A now, next, later roadmap being filtered to show the Feature Monte Carlo

They can even play around with the parameters to understand just what would need to happen in order to make that Feature that’s at risk (Red/Amber) a reality (Green) for the date they have in mind:

A now, next, later roadmap being filtered to show the Feature Monte Carlo

It’s worth noting this only works when items in the “Now” have been broken down into Features. For our “Next” and “Later” views, we deliberately stop the dynamic updates as items at these horizons should never be focused on specific dates.

Similarly, we can also see where we have Features with 0 child items that aren’t included in the monte carlo forecast. This could be that either they’re yet to be broken down or that all the child items in it are complete but the Feature hasn’t yet moved to “done” — for example if it is waiting feedback. Similarly, it also highlights those Features that may not be linked to a parent Epic (Outcome):

A Feature monte carlo highlighted with Features without parents and/or children.

Using these tools allows for our roadmap becomes an automated, “living” document generated from our backlog that shows outcomes and the expected dates of the Features that can enable those outcomes to be achieved. Similarly, we can have a collaborative conversation around risk and what factors (date, confidence, scope change, WIP) are at play. In particular, leverage the power of adjusting WIP means we can finally add proof to that agile soundbite of “stop starting, start finishing”.

Interested in giving this a try? Check out the GitHub repo containing the Power BI template then plug in your ADO data to get started…

Adding Work Item Age to your Jira issues using Power Automate

A guide on how you can automate adding the flow metric of Work Item Age directly into your issues in Jira using Power Automate…

Context

As teams increase their curiosity around their flow of work, making this information as readily available to them is paramount. Flow metrics are the clear go-to as they provide great insights around predictability, responsiveness and just how sustainable a pace a team is working at. There is however, a challenge with getting teams to frequently use them. Whilst using them in a retrospective (say looking at outliers on a cycle time scatter plot) is a common practice, it is a lot harder trying to embed this into their every day conversations. There is no doubt these charts add great value but, plenty of teams forget about them in their daily sync/scrums as they will (more often than not) be focused on sharing their Kanban board. They will focus on discussing the items on the board, rather than using a flow metrics chart or dashboard, when it comes to planning for their day. As an Agile Coach, no matter how often I show it and stress the importance of it, plenty of teams that I work with still forget about the “secret sauce” of Work Item Age in their daily sync/scrum as it sits on a different URL/tool.

Example Work Item Age chart

This got me thinking about how to might overcome this and remove a ‘barrier to entry’ around flow. Thankfully, automation tools can help. We can use tools like Power Automate, combined with Jira’s REST API, to help improve the way teams work through making flow data visible…

Prerequisites

There are a few assumptions made in this series of posts:

With all those in place — let’s get started!

Adding a Work Item Age field in Jira

The first thing we need to do is add a custom field for Work Item Age. To do this, navigate to your Jira project you want to add this in. Click on ‘Project settings’ then choose a respective issue type (in this case we’re just choosing Story to keep it simple). Choose ‘Number’ and give the field the name of Work Item Age (Days) and add the description of what this is:

Once done, click ‘Save Changes’. If you want to add it for any other issue types, be sure to do so.

Finding out the name of this field

This is one of the trickier parts of this setup. When using the Jira REST API, custom fields do not give any indication as to what they refer to in their naming, simply going by ‘CustomField_12345’. So we have to figure out what our custom field for work item age is.

To do so, (edit: after posting, Caidyrn Roder pointed me to this article) populate a dummy item with a unique work item age, like I have done here with the value 1111:

Next, use the API to query that specific item and do a CTRL + F till you find that value, it will look similar to the below, just change the parts I’ve indicated you need to replace:

https://[ReplaceWithYourJiraInstanceName].atlassian.net/rest/api/2/search?jql=key%20%3D%20[ReplaceWithTheKeyOfTheItem]

My example is:
https://nickbtest.atlassian.net/rest/api/2/search?jql=key%20%3D%20ZZZSYN-38

Which we can do a quick CTRL + F for this value:

We can see that our Work Item Age field is called — customfield_12259. This will be different for you in your Jira instance! Once you have it, note it down as we’re going to need it later…

Understanding how Work Item Age is to be calculated

When it comes to Jira, you have statuses that are respective to a particular workflow. These will be statuses items move through and also map to columns on your board. Status categories are something not many folks are aware of. These are essentially ‘containers’ for where statuses sit. Thankfully, there are only three — To do, In Progress and Done. These are visible when adding statuses in your workflow:

An easier to understand visual representation of it on a kanban board would be:

What’s also helpful is that Jira doesn’t just create a timestamp when an item changes Status, it also does it when it changes Status Category. Therefore we can use this to relatively easily figure out our Work Item Age. Work Item Age is ‘the amount of elapsed time between when a work item started and the current time’. We can think of ‘started’ as being the equivalent to when an item moved ‘In Progress’ — we can thus use our StatusCategoryChangedDate as our start time, the key thing that we need to calculate Work Item Age:

Automating Work Item Age

First we need to setup the schedule for our flow to run. To do this you would navigate to Power Automate and create a ‘Scheduled cloud flow’:

The timing of this is entirely up to you but my tip would be to do be before the daily stand-up/sync. Once you’re happy with it give it a name and click ‘Create’:

Following this we are going to add a step to Initialize variable — this is essentially where we will ‘store’ what our Issue Key is in a format that Power Automate needs it to be in (an array) with a value of ‘[]’:

We are then going to add the Initialize variable step again— this time so we ‘store’ what our Work Item Age is which, to start with, will be an integer with a value of 0:

After this, we’re going to add a HTTP step. This is where we are going to GET all our ‘In Progress’ issues and the date they first went ‘In Progress’, referred to in the API as the StatusCategoryChangedDate. You’ll also notice here I am filtering on the hierarchy level of story (hierarchy level = 0 in JQL world) — this is just for simplicity reasons and can be removed if you want to do this at multiple backlog hierarchy levels:

https://[ReplaceWithYourJiraInstanceName].atlassian.net/rest/api/2/search?jql=project%20%3D%20[ReplaceWithYourJiraProjectName]%20AND%20statuscategory%20%3D%20%27In%20Progress%27%20AND%20hierarchyLevel%20%3D%20%270%27&fields=statuscategorychangedate,key My example: https://n123b.atlassian.net/rest/api/2/search?jql=project%20%3D%20ZZZSYN%20AND%20statuscategory%20%3D%20%27In%20Progress%27%20AND%20hierarchyLevel%20%3D%20%270%27&fields=statuscategorychangedate,key

You will then need to click ‘Show advanced options’ to add in your API token details. Set the authentication to ‘Basic’, add in the username of the email address associated with your Jira instance and paste your API token into the password field:

Then we will add a PARSE JSON step to format the response. Choose ‘body’ as the content and add a schema like so:

{
    "type": "object",
    "properties": {
        "expand": {
            "type": "string"
        },
        "startAt": {
            "type": "integer"
        },
        "maxResults": {
            "type": "integer"
        },
        "total": {
            "type": "integer"
        },
        "issues": {
            "type": "array",
            "items": {
                "type": "object",
                "properties": {
                    "expand": {
                        "type": "string"
                    },
                    "id": {
                        "type": "string"
                    },
                    "self": {
                        "type": "string"
                    },
                    "key": {
                        "type": "string"
                    },
                    "fields": {
                        "type": "object",
                        "properties": {
                            "statuscategorychangedate": {
                                "type": "string"
                            }
                        }
                    }
                },
                "required": [
                    "expand",
                    "id",
                    "self",
                    "key",
                    "fields"
                ]
            }
        }
    }
}

Then we need to add an Apply to each step and select the ‘issues’ value from our previous PARSE JSON step:

Then we’re going to add a Compose action — this is where we’ll calculate the Work Item Age based on todays date and the StatusCategoryChangedDate, which is done as an expression:

div(sub(ticks(utcNow()), ticks(items('Apply_to_each')?['fields']?['statuscategorychangedate'])), 864000000000)

Next we’ll add a Set Variable action to use the dynamic content outputs from the previous step for our ItemAge variable:

Then add an Append to array variable action where we’re going to append ‘key’ to our ‘KeysArray’:

Then we’ll add another Compose action where we’ll include our new KeysArray:

Then we’re going to add another Apply to each step with the outputs of our second compose as the starting point:

Then we’re going to choose the Jira Edit Issue (V2) action which we will populate with our Jira Instance (choose ‘Custom’ then just copy/paste it in), ‘key’ from our apply to each step in the Issue ID or Key field and then finally in our ‘fields’ we will add the following:

Where ItemAge is your variable from the previous steps.

Once that is done, your flow is ready — click ‘Save’ and give it a test. You will be able to see in the flow run history if it has successfully completed.

Then you should have the Work Item Age visible on the issue page:

Depending on your Jira setup, you could then configure the kanban board to also display this:

Finally, we want to make sure that the work item age field is cleared any time an item moves to ‘Done’ (or whatever your done statuses are). To do this go to the Project Settings > Automation then setup a rule like so:

That way Work Item Age will no longer be populated for completed items, as they are no longer ‘in progress’.

Hopefully this is a useful starting point for increasing awareness of Work Item Age on issues/the Jira board for your team :)

Framework agnostic capacity planning at scale

How can you consistently plan for capacity across teams without mandating a single way of working? In this blog I’ll share how we are tackling this in ASOS Tech…

What do we mean by capacity planning?

Capacity planning is an exercise undertaken by teams for planning how much work they can complete (in terms of a number of items) for a given sprint/iteration/time duration. Sadly, many teams go incredibly detailed with this, getting into specifics of the number of hours available per individual per day, number of days holiday and, even worse, using story points:

When planning on a broader scale and at longer term horizons, say for a quarter and looking across teams, the Scaled Agile Framework (SAFe) and its Program Increment (PI) planning appears to be the most popular approach. However, with its use of normalised story points, it is quite rightly criticised due to it (whatever your views on them may be) abusing the intent of story points and, crucially, offering teams zero flexibility in choosing how they work.

At ASOS, we pride ourselves as being a technology organisation that allows teams autonomy in how they work. As Coaches, we do not mandate a single framework/way of working as we know that enforcing standardisation upon teams reduces learning and experimentation.

The problem that we as Coaches are trying to solve is aligning on a consistent understanding and way to calculate capacity across teams all whilst avoiding the mandating of a single way of working and aligning with agile principles. Our current work on this has led us down the path of taking inspiration from the work of folks like Prateek Singh in scaling flow through right-sizing and probabilistic forecasting.

Scaling Simplified: A Practitioner’s Guide to Scaling Flow eBook : Singh, Prateek: Amazon.co.uk: Books

How we are doing it

Right-sizing

Right-sizing is a practice where we acknowledge and accept that there will be variability in sizes of work items at all levels. What we focus on is, depending on backlog level, understanding what our “right-size” is. The most common type of right-sizing a team will do is taking their 85th percentile of their cycle time for items at story level, and using this as their “right-size”, saying 85% of items take n days or less. They then proactively manage items through Work Item Age, compared to their right-size:

Adapted from

John Coleman — Just use rightsizing, for goodness sake

However, as we are looking at planning for Features (since this is what business stakeholders care about), we need to do something different. Please note, when I say “Features”, what I really mean here is the backlog hierarchy level above User Story/Product Backlog Item. You may call this something different in your context (e.g. Epic), but for simplicity in this blog I will use the term “Feature” throughout.

I first learnt about this method from Prateek’s “How many bottles of whiskey will I drink in 4 months?” talk from Lean Agile Global 2021. We visualise the Features completed by the team in the last n weeks, plotting them on a scatter plot with the count of completed child items (at story level) and the date the Features were completed. We then add in percentiles to show the 50th/85th/95th percentiles for size (in terms of child item count), typically taking the 85th percentile for our right-size:

What we also do is visualise the current Features in the backlog and how they compare to the right-size value (giving this to teams ‘out the box’ we choose 85th percentile for our right-size). This way a team can quickly understand, of their current Features, which may be sized correctly (i.e. have a child item count lower than our right-size), which might be ones to watch (i.e. are the same size as our right-size) and which need breaking down (i.e. bigger than our right-size):

Please note: all Feature names are fictional for the purpose of this blog

Note that the title of the Feature is also a hyperlink for a team to open the item in their respective backlog tool (Azure DevOps or Jira), allowing them to directly take action for any changes they wish to make.

What will we get?

Now we know what our right-size for Features is, we need to figure out how many backlog items/stories we have capacity for. To do this, we are going to a run a Monte Carlo simulation to forecast how many items we will complete. I am not planning to go into detail on this approach and why it is more effective than other methods such as story points, mainly because I (and countless others!) have covered this in detail previously. We will use this to allow a team to forecast, to a percentage likelihood, the number of items the team is likely to complete in the forecasted period (in this instance 12 weeks):

It is important to note here that the historical data used as input to the forecast should contain the same mix of conditions as the future you are trying to predict. As well as this, you need to understand about the variability in your system and whether it is the right amount or too much — check out Dan Vacanti's latest book if you want more information around this. Given nearly all our teams are stable and dedicated to an application/service/part of the journey, this is generally a fair assumption for us to make.

How many Features?

Now that we have our forecast for how many items, as well as our right-size for our Features, we can calculate how many Features we have capacity for. Assuming we are using our 85th percentile, we would do this via:

  1. Taking the 85th percentile value in our ‘What will we get?’ forecast

  2. Divide this by our 85th percentile ‘right-size’ value

  3. If necessary, round this number (down)

  4. This gives us the number of ‘right-sized’ features we have capacity for

The beauty of this approach is, unlike other methods which just provide a single value in terms of capacity, with no understanding of what the risk involved with that calculation is, this method allows teams to play around with the risk appetite they have. Currently this is set to 85% but what if we were feeling more risky? For example, if we’ve paid down some tech debt recently that enables us to be more effective in delivery, then maybe 70% is better to select. Know of new joiners and people leaving your team in the coming weeks therefore need to be more risk averse? Then maybe we should be more conservative with 95%…

Tracking Feature progress

When using data for planning purposes, it is also important that we are transparent around progress with existing Features and when they are expected to complete. Another part to the template teams can use is running a Monte Carlo simulation on their current Features. We visualise Features in their priority order in the backlog along with their remaining child count, with the team able to select a target date, percentile likelihood and crucially, how many Features they work on in parallel. For a full explanation on this I recommend checking out Prateek Singhs Feature Monte Carlo blog which, combined with Troy Magennis’ multiple feature forecaster, was the basis for this chart. The Feature Monte Carlo then shows, depending on the percentage confidence chosen, which Features are likely to complete on or before the selected date, which will finish up to one week after the selected date, and which will finish more than one week after the selected date:

Please note: all Feature names are fictional for the purpose of this blog

Again, the team is able to play around with the different parameters here to understand which is the determining factor which, in almost all cases, is to limit your work in progress (WIP) — stop starting and start finishing!

Please note: all Feature names are fictional for the purpose of this blog

Aggregating information across teams

As the ASOS Tech blog has shared previously, we try to gather our teams at a cadence for our own take on quarterly planning (titled Semester Planning). We can use these techniques above to make clear what capacity a team has and, based on their current features, what may continue into another quarter and/or have scope for reprioritisation:

Capacity for 8 ‘right-sized’ features with four features that are being carried over (with their projected completion dates highlighted)

Within our technology organisation we work with a Team > Platform (multiple teams) > Domain (multiple platforms) model — a platform could therefore leverage the same information across multiple teams (in a different section of a Miro board) to present their view of capacity across teams as well as leveraging Delivery Plans to show when (in terms of dates) that capacity may be available:

Please note: all Feature names are fictional for the purpose of this blog

Domains are then also able to leverage the same information, rolling this info up one level further for a view across their Platform(s):

Please note: all Feature names are fictional for purpose of this blog

One noticeable addition at this level is the portfolio alignment value. 

This is where we look at what percentage of a Domains work is linked to our overall Portfolio Epics. These portfolio items ultimately represent the highest priorities for ASOS Tech and in turn directly align to strategic priorities, something which I have covered previously in this blog. It is therefore very important we are aware of and striking the right balance between feature delivery, the needs of our platforms and tech debt/hygiene.

These techniques allow us to present a data-informed, aligned view of capacity across our technology organisation whilst still allowing our teams the freedom in choosing their own way of working (aligned to agile principles).

Conclusion

Whilst we do not mandate a single way of working, there are some practices that need to be in place for teams/platforms to leverage this, these being:

  • Teams and platforms regularly review and move work items (User Stories, PBIs, Features, Epics, etc.) to in progress (when started) and done (once complete)

  • Teams regularly monitor the size (in terms of number of child work items) of Features

  • At all levels we always try to break work down to thin, vertical slices

  • Features are ‘owned’ by a single team (i.e. not shared across multiple teams)

All teams and platforms, regardless of Scrum, Kanban, XP, DevOps, blended methods, etc. should be doing these things already if they care about agility in their way of working.

Hopefully this blog has given some insight on how you can do capacity planning, at scale, whilst allowing your teams freedom to choose their own way of working. If you are wondering what tool(s) we use for this, we have a Power BI template that teams can download, connect to their Jira/Azure DevOps project and get the info. If you want, you can give this a go with your team(s) via the GitHub repo here(don’t forget to check against the pre-requisites!).

Let me know in the comments if you have any other approaches for capacity planning that allow teams freedom in their way of working…

Weeknotes #03

Partner Up

Last week I talked about a new initiative we’re trialling called Partner Up. Partner Up is opportunity for PwC staff below Manager grade to showcase technologies and interact with Senior Staff. Held in one to one (or one to many) sessions, volunteers are encouraged to discuss modern technologies with those who have the ability to create future opportunities for PwC.

For my Partner Up session, I had the pleasure of pairing up with Diana, who works in our IT Consultancy team. Diana had decided to showcase the capabilities of Google Sites, in particular things that could be done using Google Apps Script. 

After 45 minutes of learning a hell of a lot, including calendar integration with forms, qualtrics surveys and data visualization embedding within sites, Diana was closing the session in showing me the capability of integrating other tools we use. The highlight being the capability to embed a kanban board within a Google Site, which to me was fantastic!

Agile nerd alert 😍 😍 😍

I started to imagine a world of submitting a request via a Google Form, which then copies into a live Kanban board, where you can see the lead time for your request, where it sits in the queue etc etc…evoking memories of the Phoenix Project and visualising lead times for replacement laptops…always a dream of mine to implement something similar!

Special thank you to Diana, she really went above and beyond what I expected and it was great to have an hour dedicated to someone helping me learn.

Feedback, feedback and feedback

With our performance year coming to an end this month, the inevitable overflow of feedback requests have been hitting my inbox this week. 

One of my struggles with this time of year is determining what warrants feedback and potentially turning down requests where not appropriate. 

As a firm we have our professional framework which, whilst important, feels unfair/unfit for purpose when, for example being asked to score someone against “global acumen” if the work they did was help me out on something small locally. Similarly, I often find people request feedback as a means to showcase they’ve completed work, rather than using it for a constructive conversation centred on development. If that’s the reason for a feedback request then surely we’ve lost the spirit of it?

So yes, I really struggle with this time of year, also as I find it increasingly challenging with what we do to quantify the impact myself and our team is having on the organisation. 

How do you quantify internal coaching impact? Number of people trained? Training NPS? Number of Agile projects vs. Waterfall? Number of teams coached? New products launched using Agile principles? Portfolio WIP trend? Portfolio/team cycle time? Individual feedback?

I’m still learning about what we can look at empirically in supporting what we do, but for now have settled on a blend of all the above in terms of my own performance appraisal. 

Before you ask, yes, we are still doing annual performance reviews. 

Mid-year reviews take place as a checkpoint and more of an informal discussion, but end of year is when you get your performance rating which may/may not be attributed to a pay increase and/or bonus. 

The majority of people I talk to express surprise/dismay we still do it this way.

I’ll put that down as one for the cultural debt backlog to be addressed long term…

Training

Today I’ve been running another Hands On With Azure DevOps session, this time for folk in our Consulting team. The session has gone well, with pretty much all attendees feeding back that they had learnt a thing or two, which is the main thing for me. One particular feedback was that it was “the best training someone has been to in the past year” — I didn’t stop to ask if this was the only training they had been on ;)

The course is structured like so:

I learnt that I didn’t have the right setup for enterprise licenses today, which meant a number of people couldn’t move work items on the board — not ideal! However I found a workaround through pairing and learnt about what I need to fix for next time…so a good day for me on the learning front as well.

For those of you who are users, I’d love to hear if you have any feedback on the above and if you think there are significant gaps for first time users.

Next week

Next week I’ll be finishing my performance appraisal, putting my Google Sites learning into practice, and heading up t’north to our Manchester office for an Agile Foundations session. Looking forward to a week of reflection, learning and starting others on their Agile journey.

Weeknotes #02

Wroclaw (Vrohts-wahf)

As I mentioned in closing last week, I headed out to Wroclaw (pronounced Vrohts-wahf) to visit one of our suppliers this week.

Accompanied by Jon, Andy and Stuart we had 3 days of good discussion on Agile, DevOps, Product Management, UX, Data Science, Security and, what is fast becoming my favourite topic, anti-patterns. 

Whilst there was some really impressive stuff that we saw, mainly from a technical practices perspective, there were a number of anti-patterns identified in our *current* Agile ways of working, largely being imposed from within our own organisation. Sprint zero, gantt charts, change advisory boards (CABs) approving all deployments (even to low level environments), RAG status, the iron triangle as the measure of project success, changes in scope needing a change request to be raised — all got a mention. 

It’s clear that we still have a large amount of cultural debt to overcome. 

For anyone new to the concept of cultural debt, Chris Matts describes it well in that it commonly comes in two forms:

As a team we are very strict in our interactions with individuals that training and/or coaching must be via pull rather than push (i.e. opt-in). 

However the second point is, I feel, much tougher. Plenty of teams are wanting to plough on ahead and get a kanban board setup, do daily stand-ups and retrospectives, etc. and, whilst this enthusiasm is great, the mindset and reason why we’re choosing to work in this way is often lost.

An outcome of our discussion was creating a supplier working group to work with our team, so we can share some of the approaches we’re taking to encouraging Agile ways of working, and how we can collaborate and support, sharing data/examples to drive continuous improvement rather than taking on the organisational challenges individually.

Less is more?

We also had the last couple days of our Sprint this week as a team. 

We like to work in 4-week sprints, as we find this is the right balance in cadence and as a feedback loop with stakeholders. From the end of Jan we went down to one less team member, so with five in our team I was interested see how our throughput was compared to previous sprints.

Our team throughput per sprint over the last 6 sprints

As you can see, this sprint we managed to complete more work items than in any sprint prior.

Upon review as a team, the general consensus was that we put this down to having run more training in this sprint compared to previous sprints (a training session is 1 PBI on our backlog) and that as we trained more people it spawned off more opportunities from a coaching standpoint. We’re going to stick with current team size going forward, mainly due to a good dynamic as a team and having a good variety of skillset.

Done column = 😍😍😍 (shoutout

Agile Stationary

for the stickies)

One thing we did try this sprint as an ‘experiment’ over this sprint was working with both physical and digital boards. It’s rare for us as a team to have a day where everyone is in the same office, so primary for us is a digital board. However we wanted people to also have the view of a physical board in our London office, mainly so they could see what we were working on and how a kanban board works in practice. Whilst we’ve not had loads of questions, general feedback seems to be positive and people like seeing it in action — we’re hoping it encourages others to experiment with physical and/or digital versions of their workflow.

TIL Python

One learning I have made this week is I’ve picked up a little bit of Python knowledge. One of my biggest frustrations with FlowViz has been how the Scatter Chart within Power BI cannot handle date values and can only use whole numbers in the X-axis, therefore needing a date string (i.e. 20190301) which of course, is then treated as a number rather than a date (so 20,190,301) leading to a rather bizarre looking scatter plot.

And the award for most useless Scatter Chart goes to…

However this week Microsoft announced that python visuals are now available in the web service and hence, I could ‘code’ my own python chart to display the scatter chart how I really wanted it to be.

After some browsing of the web (read: Stack Overflow) I managed to get a scatter chart working with my dataset. However I needed the brilliance of Tim in our Data Science team to help get the dates working how they should be (checkout his Tableau public profile btw), as well as clean up the axis and add my percentile line. It’s not *done done* yet as it needs a label for the percentile line but I’m pretty pleased with how it is now looking.

Much better (thanks Tim!)

Next Week

Next week I’m running what I hope will be the polished version of our Hands on with Azure DevOps course for a group of 20 in Consulting. 

I’ll also be learning about Google Analytics, as we launch our Partner Up initiative where senior staff pair up with someone junior who then demos and coaches the more senior person about a new tool/technology, all in the spirit of creating a learning organisation — looking forward to sharing my own learnings with you all next week.

Weeknotes #01

Why weeknotes?

Recently, I’ve been inspired a lot by reading the Weeknotes of both Sam Lewis and Rita Goodbody, who are doing some excellent work with Novastone Media. What’s great about their work is that each week they share their learnings (please give them both a follow!), both being very open around challenges they’re facing, accomplishments they’ve made each week and share their stories. After getting into the habit of checking Twitter on a Friday afternoon for their latest posts, I figured why not give it a try myself. 

Special mention to Sam who I have known for a while now through the Kanban world, who first introduced me to the concept. 

Like him I really like this point:

Writing creates a basic feedback loop. Before getting feedback from other people, you can literally get feedback from yourself.

So yes, this will be something I’ll be trialling for a bit…

Helping others learn, whilst learning myself

This week I ran a ‘Hands on with Azure DevOps’ session for our Project Management group. Having been asked by another area of PwC to run a similar session in March, I offered out the opportunity for the PM’s to be the first to experience it…with the proviso that it was the first iteration so not everything would work smoothly! 

One thing I have learned in adoption of new tools is just showing how to use it isn’t enough, so I created a sandbox Azure DevOps collection/organisation setup each attendee with their own project, then showing them how to do something, then they get to create their own variation within their environment. I had printed workbooks as a supporting tool (in case they got stuck), but deliberately only had enough for one per pair, forcing a bit of collaboration. A few things went wrong, mainly in how I structured the first bit of the course by having them create multiple teams, on reflection I realised that keeping it simple and using the default team would have been better. Generally, people said they really enjoyed it and that it has helped them learn a lot more, with also some feedback that the pace was maybe a little too quick, so there’s a bit of learning for me as well around my delivery.

Training, training and more training

The rest of the week has been mainly filled with continuing internal enablement through our team running 1-day Agile Foundations courses. 

On Tuesday I paired up with Marie to run a session, and yesterday myself and Dan delivered another. I’m shocked that so many people have signed up (out of a function of 220 people, 180 people will have attended by the end of March), as we were very clear in wanting people to “pull” the training, rather than be forced to attend. One person who attended yesterday said in the intro that they had ‘high expectations’ because they had heard so many good things, which was nice to hear and set the tone for a good day. Based on the feedback we received it seems all attendees really enjoyed it. One individual let us know that it was “probably the best training they have been to in years” which, whilst very flattering, does make me wonder what other training they have attended!

Mid-flow on my favourite topic (metrics)

The course itself is very hands on, we’re keen to give people the principles and also dispel some myths that Agile = Fast and/or Agile = Scrum, something which is a bit of a personal bugbear of mine. We introduce the manifesto and the principles then support that with a game of Agile Eggcellence, then cover Scrum before lunch (using the Scrum guide — not some internally warped version of Scrum) as well as the often overlooked technical excellence aspects such as CI/CD. After lunch we introduce the Kanban method using Featureban, then go into User Stories, Minimum Viable Product, again supporting that with some examples and the Bad Breathe MVP game.

Final section of the day is centered on business agility — here we look at INGs Agile Ways of Working journey (to inspire — not to copy/paste!), the outputs from the State of DevOps report, as well as internal/client case studies. 

The main thing here is in an IT context to open up the discussion around what our impediments are and, more importantly, how can we collectively overcome them. Once that’s done we finish with a game of “40 seconds of Agile” — a variation on 30 seconds of Scrum with some Pocket Scrum Guides for the winning team.

Marie and Dan have both grown into the delivery of the training incredibly well. When we first started these sessions it was myself doing the majority with themselves supporting, whereas now most sessions are split 50/50. 

They are both also great at weaving in their own experience/stories into their delivery which for me, adds a further element of ‘realism’ for attendees. I’m very fortunate to work with them (as well as James and Jon in our team) as part of our Agile Collaboratory team, in particular due to their enthusiastic yet pragmatic approach.

Going for (Agile) Gold

Eyes closed — no gold medal for being photogenic

Wednesday night we held our first Agile Olympics event within one of our London offices. The event was in two parts, for the first half teams were given a case study around product decomposition and had a roughly an hour to analyse a case study and do some initial visioning around the product and producing a vision with various increments as part of it. The second half was a quiz using the Kahoot app, with prizes for the top three teams for both rounds. I was heavily involved in helping formulate the case study and write the quiz, as well as being one of the main judges for the case study outputs from the teams. It was a really fun event, with nine teams across different business lines entering. All of them did a great job in focusing on user needs and business outcomes for their product, rather than outputs and making a list of features. Some Partners appeared to be a bit upset at their quiz performance and demanded copies of the answers which, given the quiz contained a number of anti-pattern questions (what is Sprint Zero, etc.) shows to me we still have work to do internally. We’re hoping this is the start of many events where we can grow the Agile & DevOps coaching network across the UK.

Project to Product

Over the Christmas period, I found myself immersed in Mik Kersten’s Project to Product book. For me, the book is brilliant and very much represents the future of work for large organisations that they need to adopt in order to remain relevant/successful. Product thinking and the whole #NoProjects movement has been a keen interest of mine in the past two years, with us slowly starting to introduce some of that thinking internally. The past few weeks we’ve been formulating our first Value Stream which, for our context will be a service (with a set of long-lived products) or a major product, with multiple teams within the value stream supporting that delivery.

One of the things we’ve been looking at is the roles within a value stream, whilst teams will self-organise to choose their own framework/ways of working, what should be the role of the person ‘owning’ that value stream?

The working title we have gone with is a Value Stream Owner (VSO), with the following high-level responsibilities:

The owner for the Value Stream must be able to manage, prioritise and be responsible for maximising the delivery of value for PwC, whilst staying true to Lean-Agile principles. 

Specifically, there is an expectation for this individual to be comfortable with:

  • Small batch sizing (MVPs/MMFs), prioritisation and limiting work in progress (WIP)

  • Stakeholder management and potentially saying ‘not yet’ to starting new work

  • Learning and understanding flow metrics, using these to gain better insight and improve the flow of value

  • Inspect and adapt — You will be familiar with the concept of ‘inspect and adapt’ and showcase that in your work

  • Focusing on business outcomes over outputs

  • Ensure that continuous improvement is at the core of everything you do and that you encourage all members of the value stream to be on the lookout for new and better ways of creating value

It’s proving to be challenging, mainly due to finding suitable groupings for such a large IT estate, but we’re getting there…hoping to formulate the team(s) in the next 2 weeks and start working through the Value Stream backlog.

Next week

Next week I’m heading out to Wroclaw, visiting one of our suppliers which should be interesting (I get to meet their Tribes — and no they are not a music streaming company!). Travelling abroad always presents a challenge for me, I don’t like compromising on not attending key meetings in the UK just because I’m out of the country, so will be a delicate balancing act of getting value from the trip vs not getting behind on other work. I’ll be sure to share next week how that goes.

Using data visualisation to aid deadline driven Agile projects…

Quite often in the agile world, you will come across pieces of work that are deadline driven.

Whilst it can be negotiated in some instances, other times it’s just something we have to deal with as this is the world we live in.

Some people (myself included) are focused on delivering value continuously, whereas others still have a deadline orientated mind-set because, it may be the only way they’re familiar with working, it may be imposed upon them (legislative/regulatory for example) or quite simply this may be the only way they motivate themselves to actually do the work.

For these scenarios we need to know how best to handle this when working on agile projects as one of our biggest challenges is how to manage the delivery when working to a deadline.

You will have stakeholders/PO’s/management pressuring you to ‘meet a deadline’ yet unwilling to compromise on scope.

“You have to deliver it all” is a typical response for those that have not had the benefit of coaching on what agile truly means, and it can create an unnecessary pressure on the team.

So how do you tackle this?

Well for one, we know that delivering “everything” directly contradicts agile principles.

Remember, Agile is about working smarter, rather than harder.

It’s not about doing more work in less time; it’s about generating more value with less work.

You will need strong customer negotiation/stakeholder management (as well as a lot of patience!) skills to get this message across, relying on management where needed to help support you.

What I find the most helpful in these scenarios is showing stakeholders that if they want ‘everything’, just how long it will take.

For those curious on how best to get this message across visually, a follow on post will show you how you to do this using data/probabilistic forecasting.

However, our question today is deadline driven. 

So how can we do this visually?

Potentially Deliverable Scope (PDS) Chart

This chart uses Monte Carlo simulation and the actual movement of cards across a team's board to predict how far down the backlog a team will get for a specified budget or timeline for a selected project or release.

The model predicts the ‘Probable’ and ‘Possible’ deliverable scope, which helps the business focus on the marginal scope.

Take this example chart (generated 14th Feb) with a finish date of 3rd March for a project/release:

The chart represents the current backlog order, as well as the sizes of each backlog item being relative to the points estimate per PBI (user story).

Pink items are currently In Progress, Grey items are To Do. 

The title, person assigned to (removed for the purposes of this data) and unique ID for a backlog item is also visible, with the ability to click on an item taking you to the actual backlog item in your respective tool (Jira, TFS, etc.).

There are 3 areas to look at:

1) Anything above the ‘Probable’ Line

These items will almost certainly be delivered. 

As you’ll see for this team that is currently everything that is In Progress.

2) Anything below the ‘Possible’ Line

These items will almost certainly not be delivered, however if a stakeholder sees something we are definitely not going to get to, this allows them to visually see the priority of an item and if this needs to be moved up/down the backlog priority.

3) The scope that *could* still be delivered

This should be the area that everyone focuses on.

This is where the team *could* get to by the deadline if the team and business work through the priorities to improve throughput. This could be through story slicing, closer collaboration, etc.

This chart can be run every few days, with the ability to change date/data range used, scope change, throughput increase or an increase in any rework needed.

This is hugely beneficial when wanting to visualise using data (rather than speculation) how far down the backlog you will get by a given date, which will in turn significantly help in managing those tough questions from stakeholders.

For those interested in exploring this further, please reply below or get in touch directly.